

Advanced AWS: Structuring and Deploying Three-Tier Applications
Implementing a Three-Tier Solution in AWS: Step-by-Step Instructions

1. Why We Need This Usecase
This architecture is essential for developing scalable, secure, and maintainable web applications. It separates concerns across three distinct layers presentation, application logic, and data storage improving manageability and reducing the impact of changes in one tier on another. This separation allows for better security, efficient load distribution, and more straightforward scalability in cloud environments like AWS.
2. When We Need This UseCase
When developing enterprise-level applications that require robust scalability and security.
When migrating from a monolithic architecture to a microservices or layered architecture.
During the initial design phase of a new web application requiring efficient resource management and scalability.
3. Prerequisites for the Lab
An active AWS account with administrative access.
Knowledge of AWS services such as EC2, RDS, VPC, S3, IAM, and Route 53.
Familiarity with web technologies and database management.
Basic understanding of networking concepts and Linux commands.
4. Advantages and Disadvantages of This Use Case
Advantages:
Scalability: Each layer can scale independently based on demand.
Security: Enhanced security due to separation of layers, minimizing the risk of direct exposure of the database to the front end.
Flexibility: Easier to update or modify one layer without affecting others.
Disadvantages:
Complexity: More complex to set up and manage compared to simpler architectures.
Cost: Potentially higher costs due to multiple instances and services running simultaneously.
Interdependency: While layers are independent, they are still interdependent in terms of data flow and responses, which can create bottlenecks if not managed properly.
5. Step-by-Step Implementation Instructions
This usecase provides the tasks required to build a three-tier architecture using AWS services. The documentation begins by explaining what the three-tier architecture is and its benefits. From there, the documentation explains, step by step, how to build the architecture in AWS. Let’s dive right in.
A three-tier application architecture is a client-server architecture that has a presentation tier (aka web tier), a logic tier (aka application tier) and a data tier (aka database tier). The web tier is a graphical user interface that communicates with the other two tiers through API calls. The application tier is written is a programming language and handles business logic that supports the application’s core functions. The database tier The data tier consists of a database and a program for managing read and write access to a database. The benefits of the three-tier application architecture are many let’s cover a few.
Faster development: Each tier can be developed simultaneously by different teams, this allows organizations to bring the application to market faster.
Improved scalability: Any tier can be scaled independently of the others as needed.
Improved reliability: An outage in one tier is less likely to impact the availability or performance of the other tiers.
Improved security: The presentation tier and data tier cannot communicate directly, this helps in preventing SQL injections and other malicious exploits.
Now that a baseline is set, let’s build!
Prerequisites
An AWS account with IAM user access
Familiarity with the AWS Management Console.
An understanding of Linux commands
Familiarity with VPC, EC2 instances, Auto scaling groups, and security groups.
Documentation
There are a number of objectives that must be accomplished to set up a system for success:
Building the base infrastructure
Building the Web Tier
Building the Application Tier
Building the Database Tier
Additionally, each objective has a number of subtasks to accomplish.
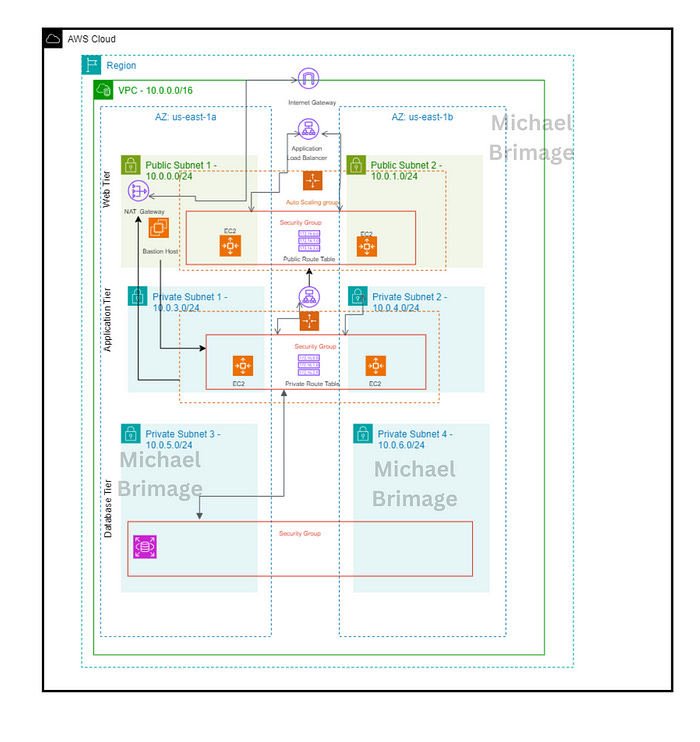
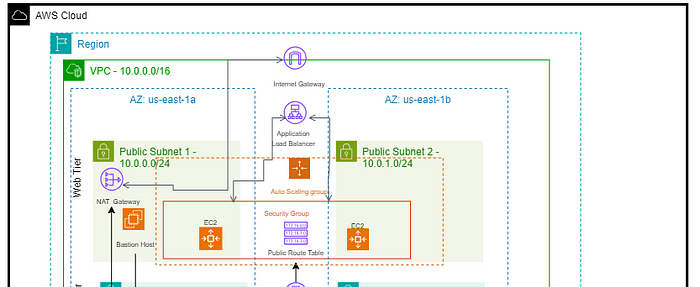
Building the base infrastructure
Before the designed three-tier architecture is built, foundation must be laid. The base infrastructure consists of the following:
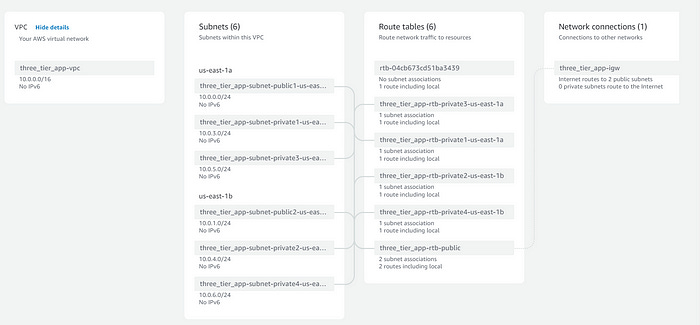
Four private subnets spread over two availability zones for high availability
Two public subnets spread over two availability zones for high availability
One NAT Gateway (two gateways over two availability zones for high availability)
One public route table
One private route table
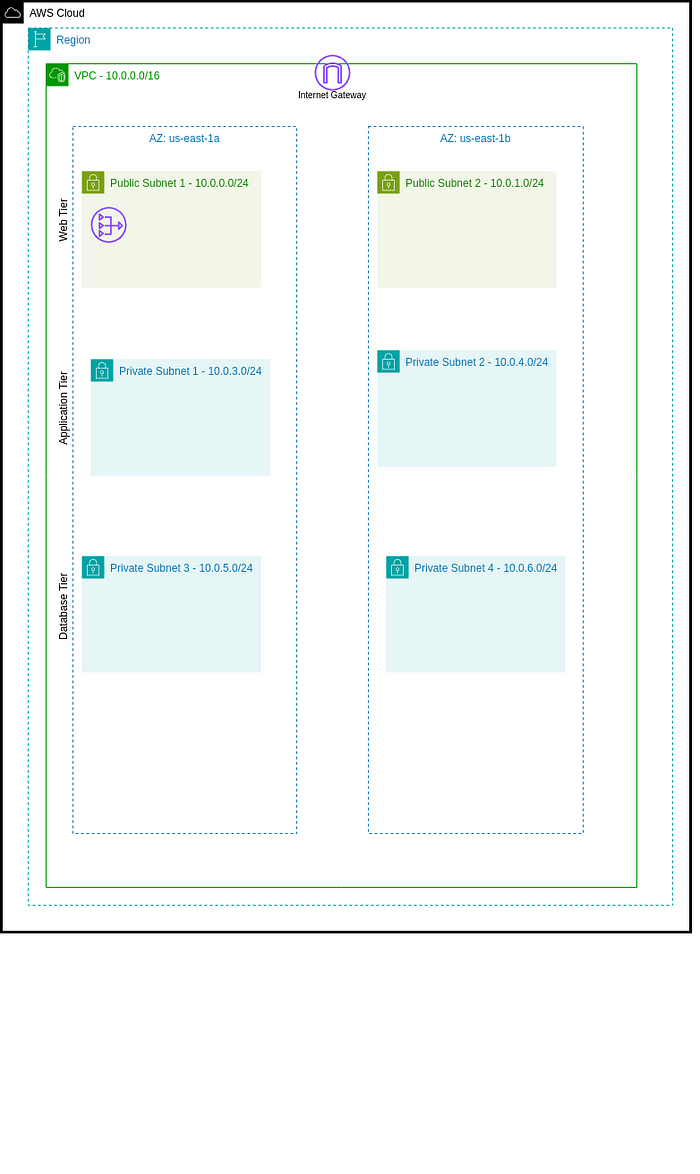
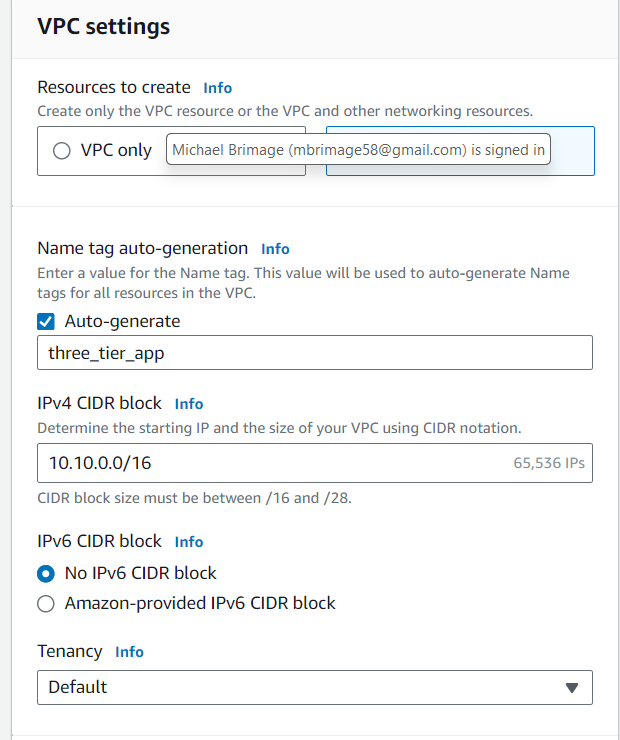
Using the AWS Management Console → VPC and more option, create a VPC with a CIDR Block of 10.0.0.0/16. The previously identified parameters are set up at this point also. However, the NATs will be created later
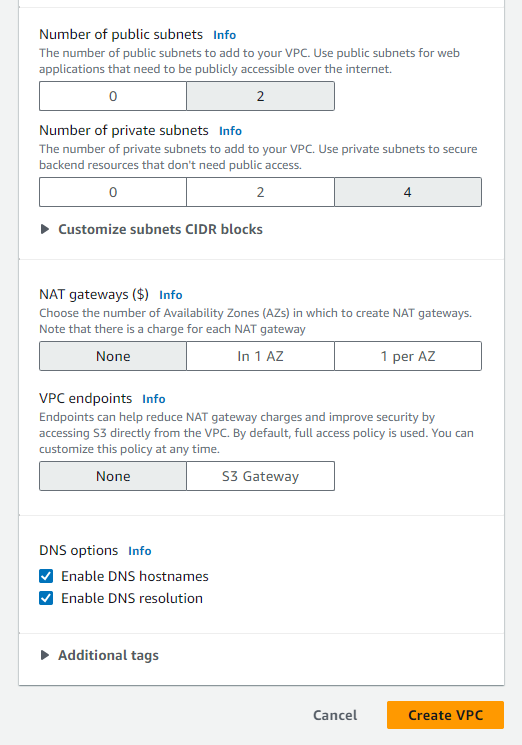
Ensure that both public subnets have IPv4 addresses auto assigned. This can be accomplished in the console VPC → Subnets →Edit subnet settings.
Configure public route table
When VPCs are created, a default (main) route table is created as well. Additionally, each subnet is created with its own route table. The default configuration provides six route tables, which is too many. Select one route table from the “Route tables” dashboard and set it as the main table under the “Actions” dropdown menu.
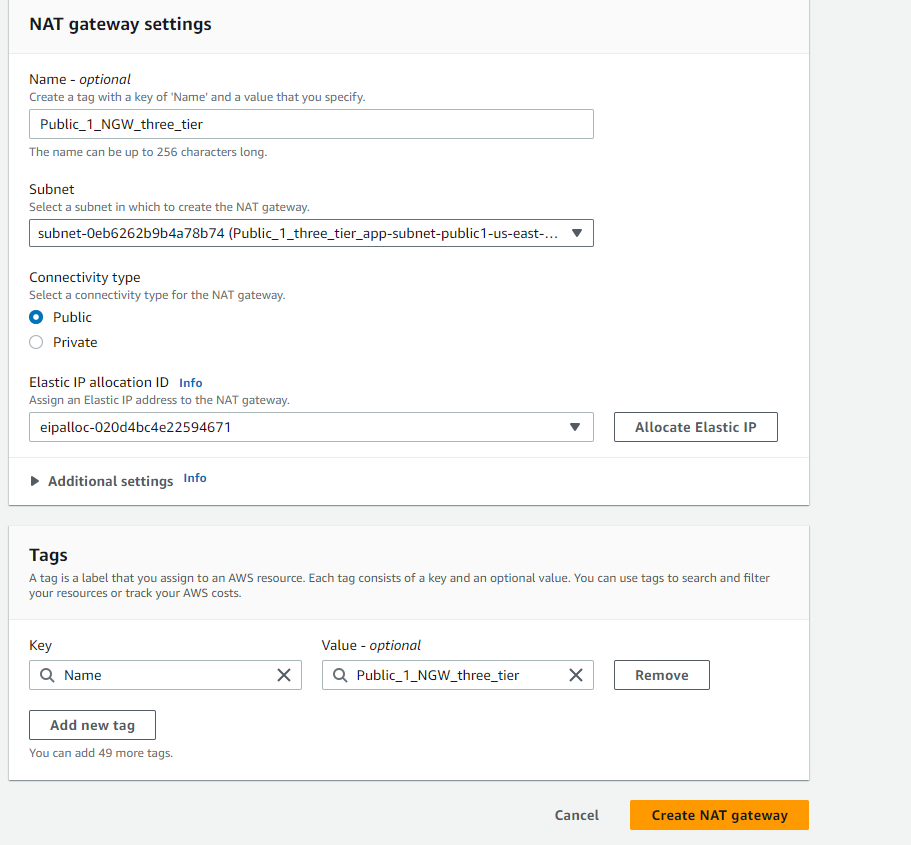
Configure NAT Gateway
NAT Gateways allow private subnets to access public resources by “translating” private IP addresses . This architecture requires two NAT gateways. Navigate to NAT Gateways from the console VPC →NAT Gateways to create one NAT Gateway and assign one NAT gateway a public subnet. Ensure that an Elastic IP is allocated the the NAT Gateway.
NOTE — For high availability use two NAT Gateways and assign one NAT gateway to each public subnet. Ensure that an Elastic IP is allocated to each gateway.
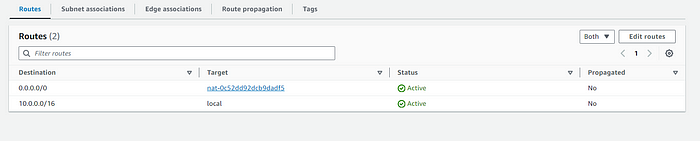
Configure private route tables
Select a private route table and associate all four private subnets with the selected table. VPC → Route tables → select a route table →Edit subnet associations
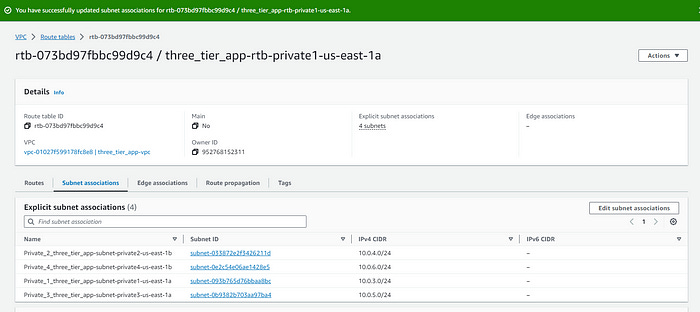
The private route table must be updated with the NAT gateway to allow private subnets access to resources outside of the VPC. VPC →Route tables →select a route table →Edit routes
With this, the foundation is laid. The next step is to build tier one of the three tier architecture, the frontend (web tier).
Tier one: Web Tier
The required services for the web tier are webservers, AWS EC2 instances, in an auto scaling group and an application load balancer.
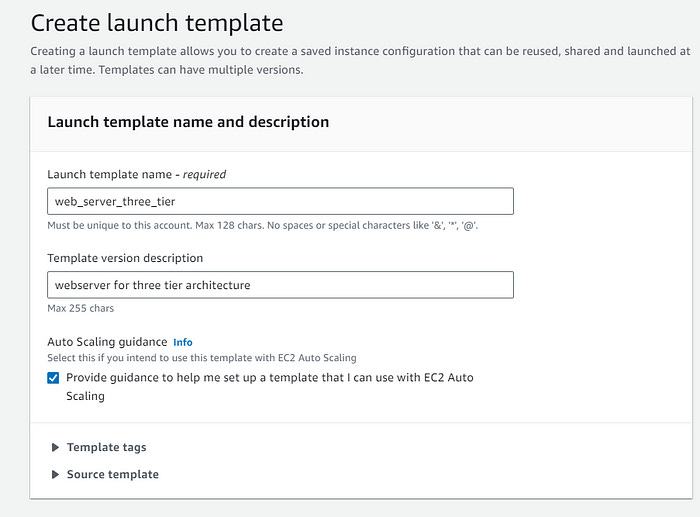
Web server launch template — defines the EC2 instances provisioned for the web servers
Auto Scaling Group (ASG) — provisions EC2 instances dynamically
Application Load Balancer (ALB) — routes incoming traffic to the proper targets
Create Webservers
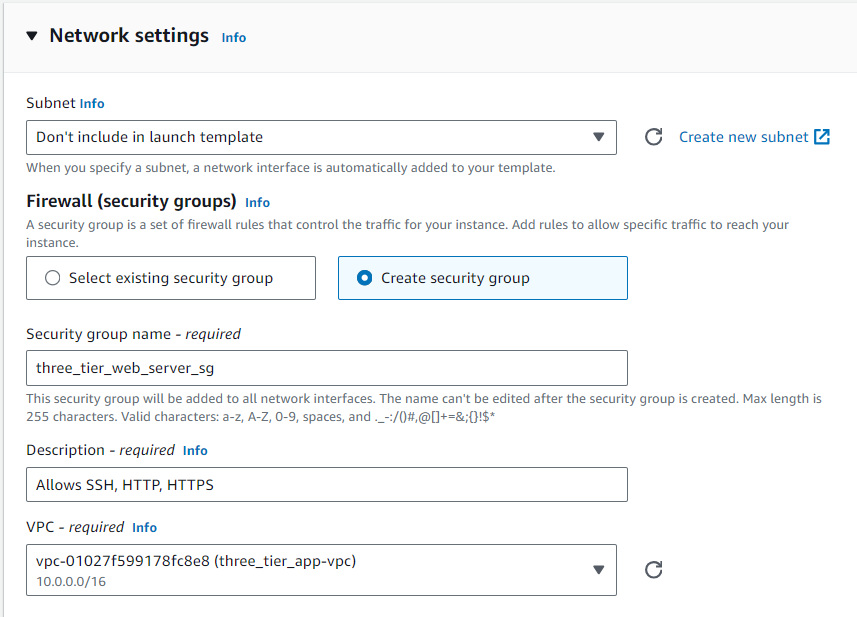
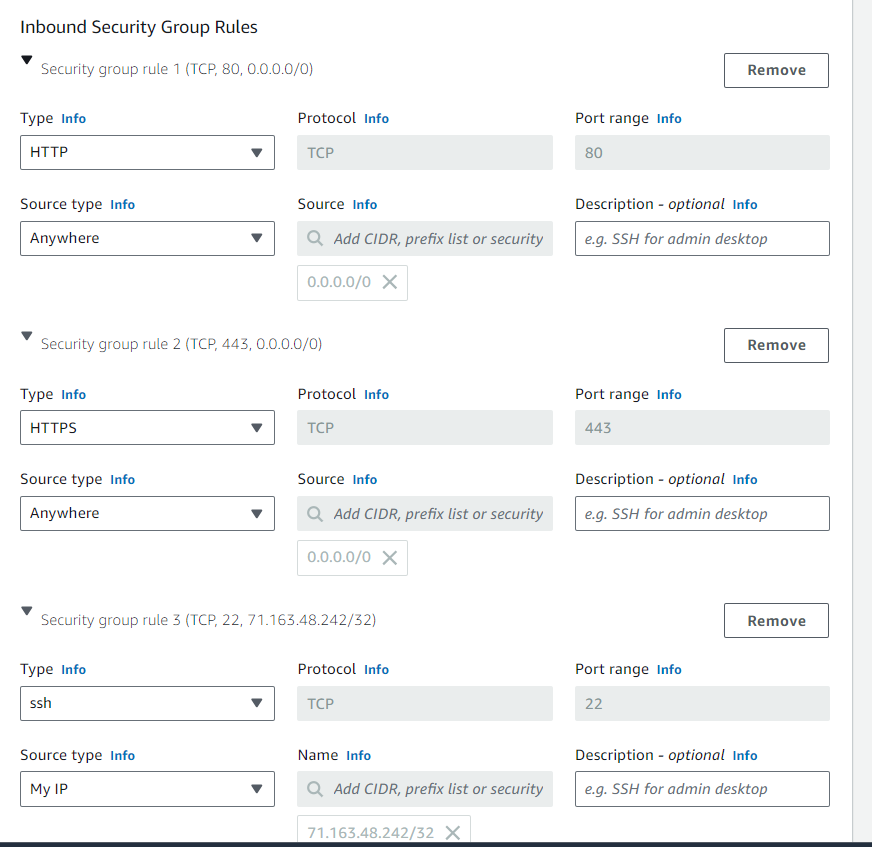
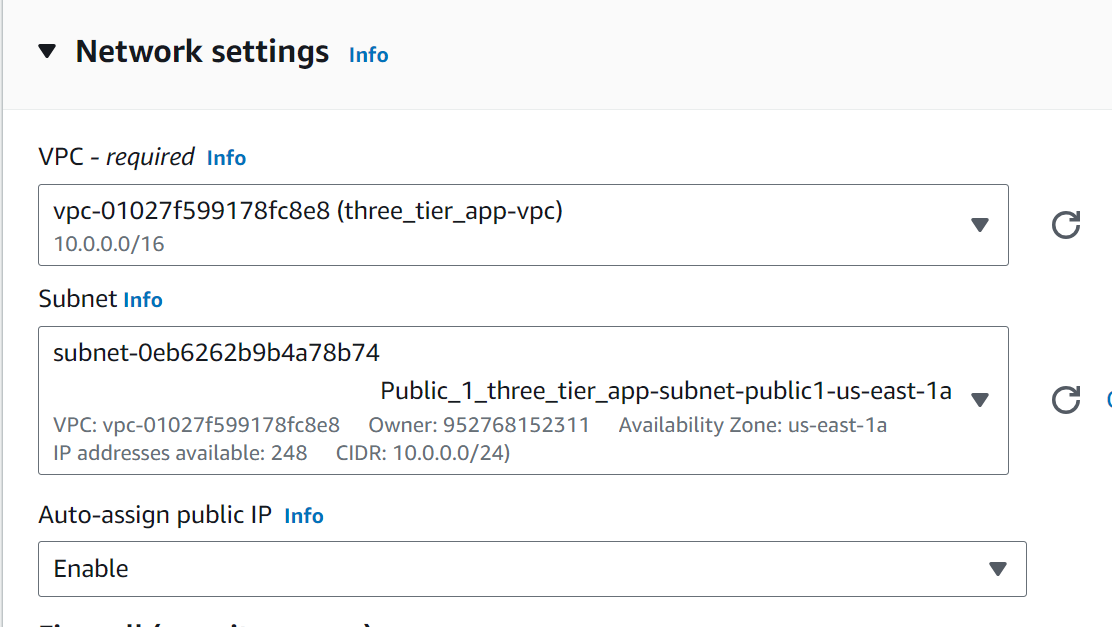
To minimize errors and scale dynamically webservers for this tier are created based on launch templates. From the console EC2 → Instances → Launch Templates, create a new template. This tier requires remote secure access to the application tier so ensure that a key pair is used in the creation. Create a new security group allowing inbound SSH, HTTP and HTTPS. Select the VPC created in the previous section.
To finalize the launch template for the servers, enter the below script in the user data section, found under Advanced details.
#!/bin/bash
yum update -y
yum install -y httpd
systemctl start httpd
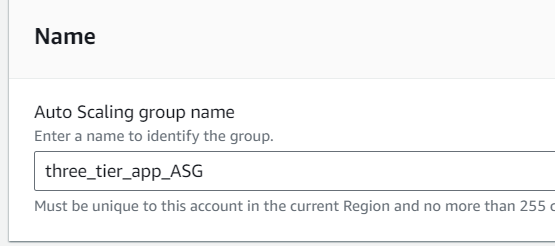
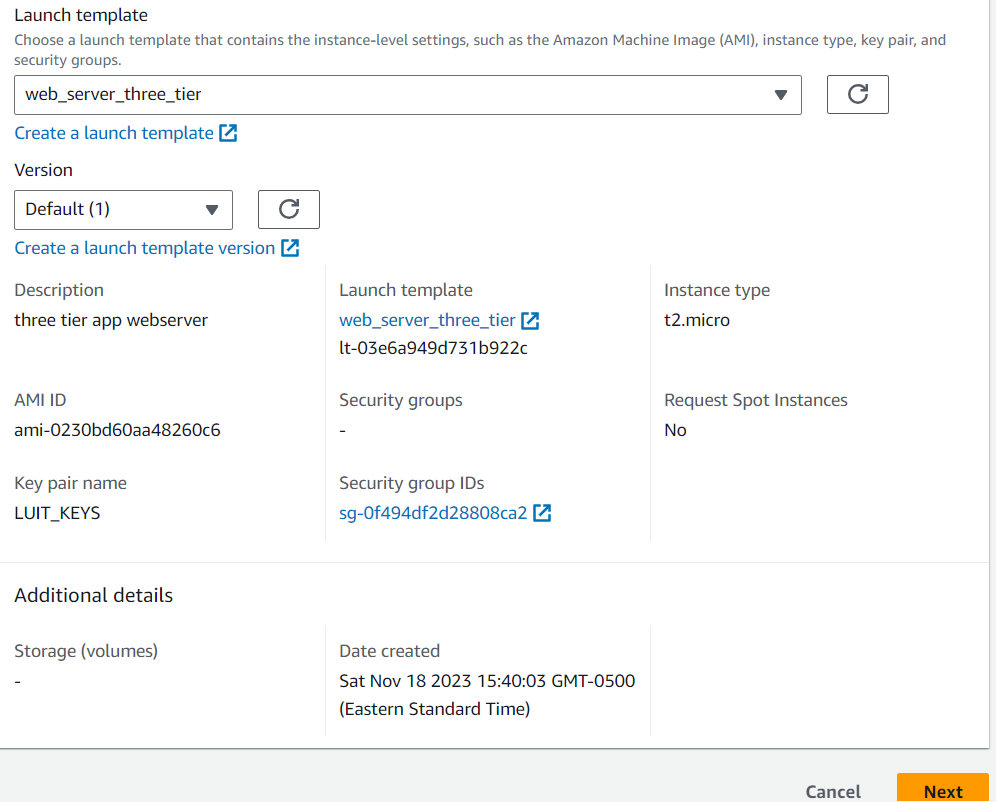
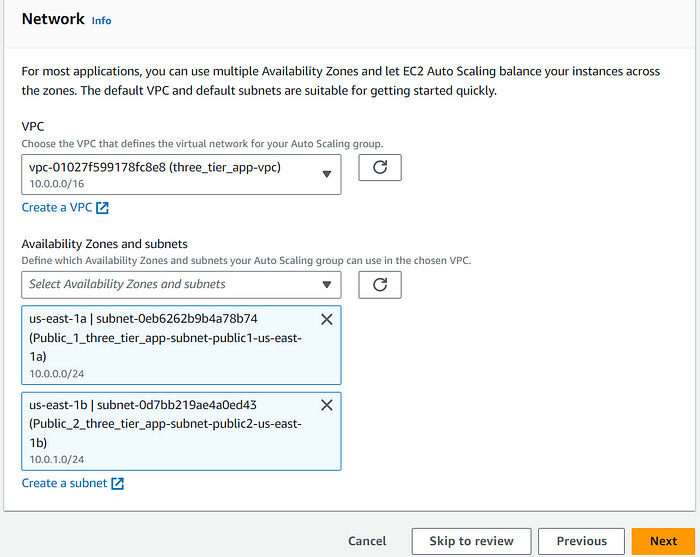
systemctl enable httpdCreate an Auto scaling group Navigate to Auto Scaling From the EC2 console (or navigation menu) EC2 → Auto Scaling → Create Auto Scaling Group. The auto scaling group will use the launch template created in the immediate preceding steps. Ensure the appropriate VPC and public subnets are a selected.
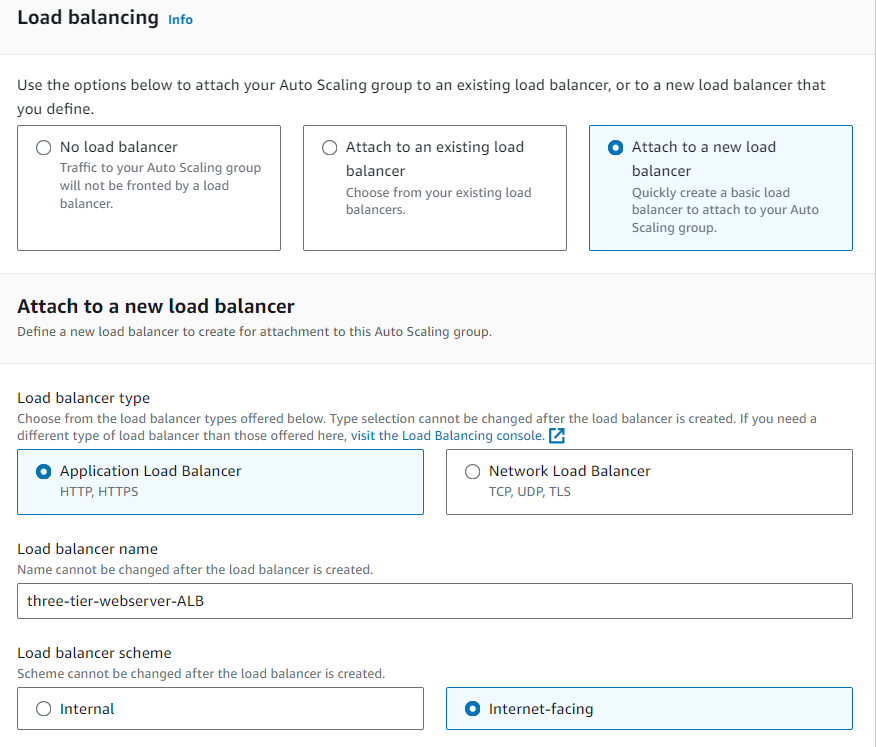
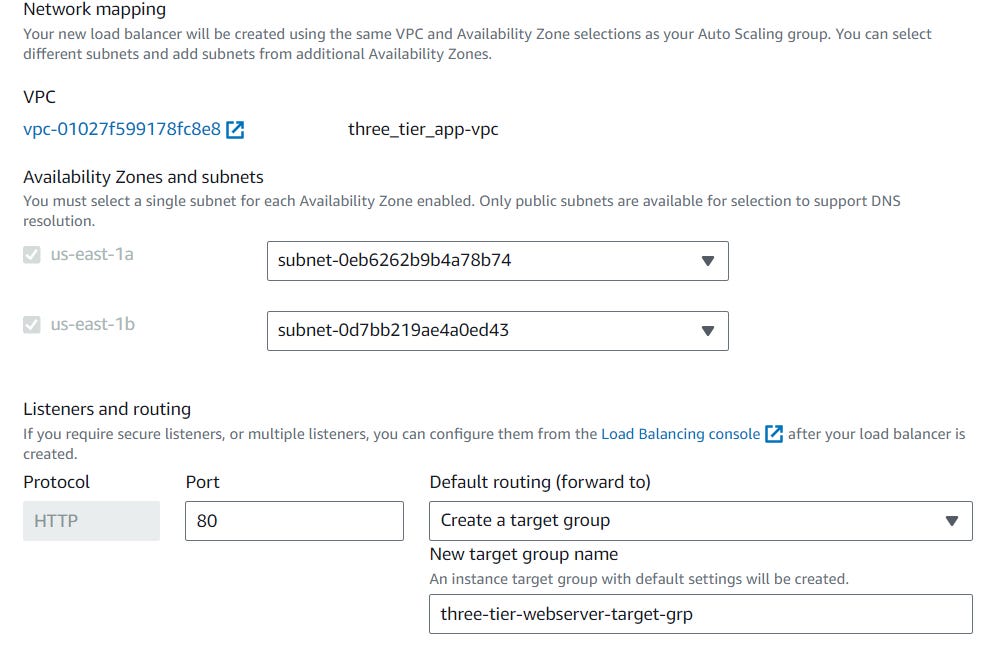
Create an Application Load Balancer (ALB)
While creating the auto scaling group, the first application load balancer can be created as well. Attach a new load balancer to the ASG. This load balancer is internet facing so it can route requests from clients over the internet to the EC2 instances in the application. Ensure that the appropriate subnets are selected. The ALB needs to ‘listen’ over HTTP on port 80 and a target group that routes to our EC2 instances.
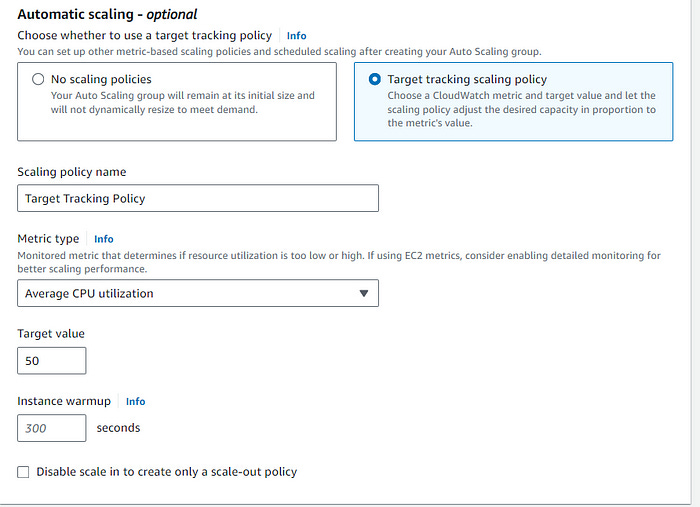
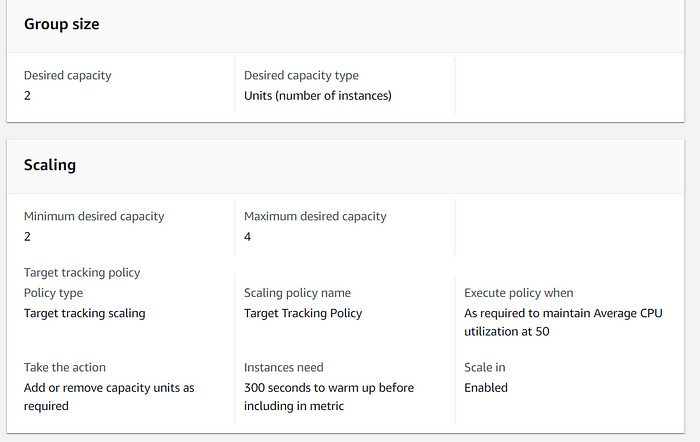
Set the group size to desired capacity, in this case desired capacity is 2. For scaling, set the min and max according to tolerance the particular use case. Lastly, this use case requires the use of a dynamic scaling policy, see below.
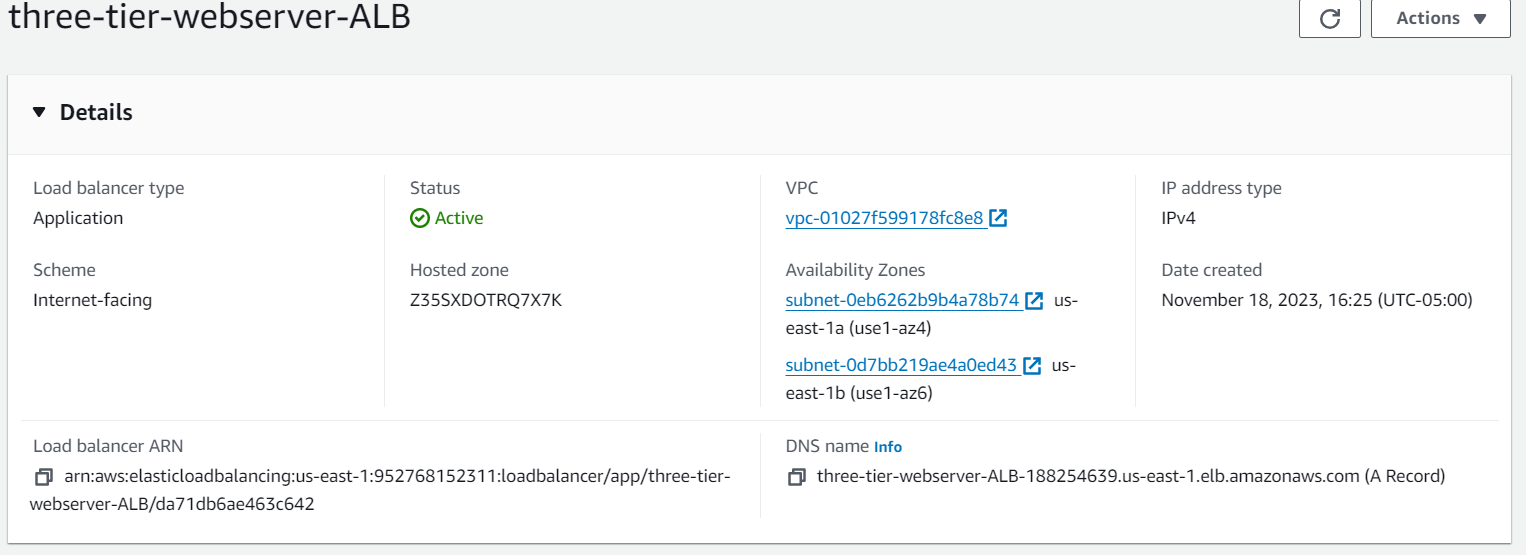
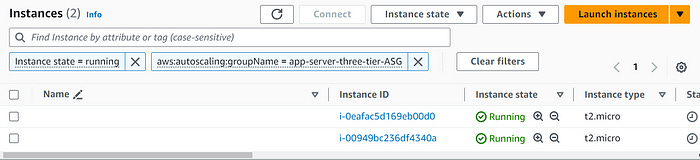
Review settings and create the ASG. Once the ASG is fully initialized, navigate to EC2 dashboard and see that two EC2 instances have been deployed.

To see if the ALB is working properly, copy its public DNS and paste in a new browser. The website should be accessible based on the user date implemented when creating the EC2 launch template.
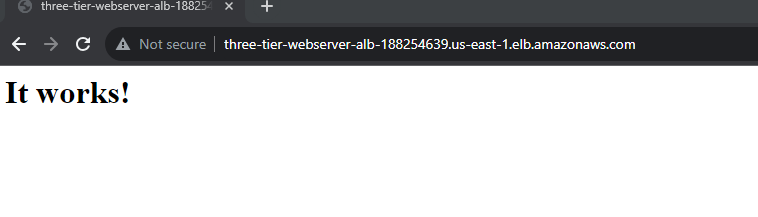
Lastly, confirmation of SSH access to the server is required. For the sake of brevity only one instance is confirmed.
The frontend (web tier) works as it should! Continuing on…
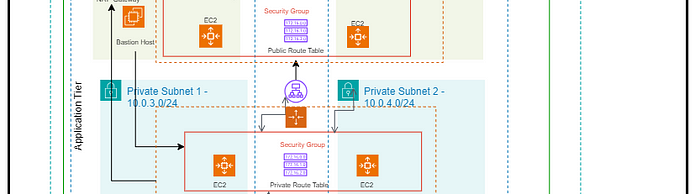
Tier Two: Application Tier
The required services for the application tier are a launch template, an auto scaling group, an application load balancer and a bastion host.
Application server launch template — defines the EC2 instances provisioned for the application tier
Auto Scaling Group (ASG) — provisions EC2 instances dynamically
Application Load Balancer (ALB) — routes incoming traffic to the proper targets from the web tier
Bastion host — to securely connect to application servers.
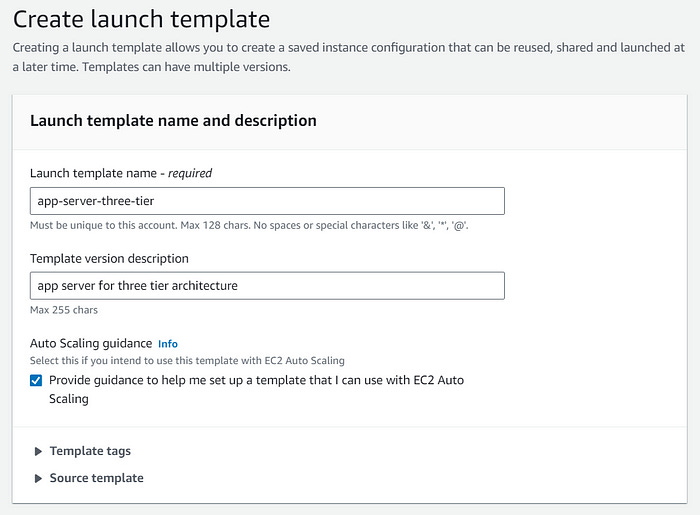
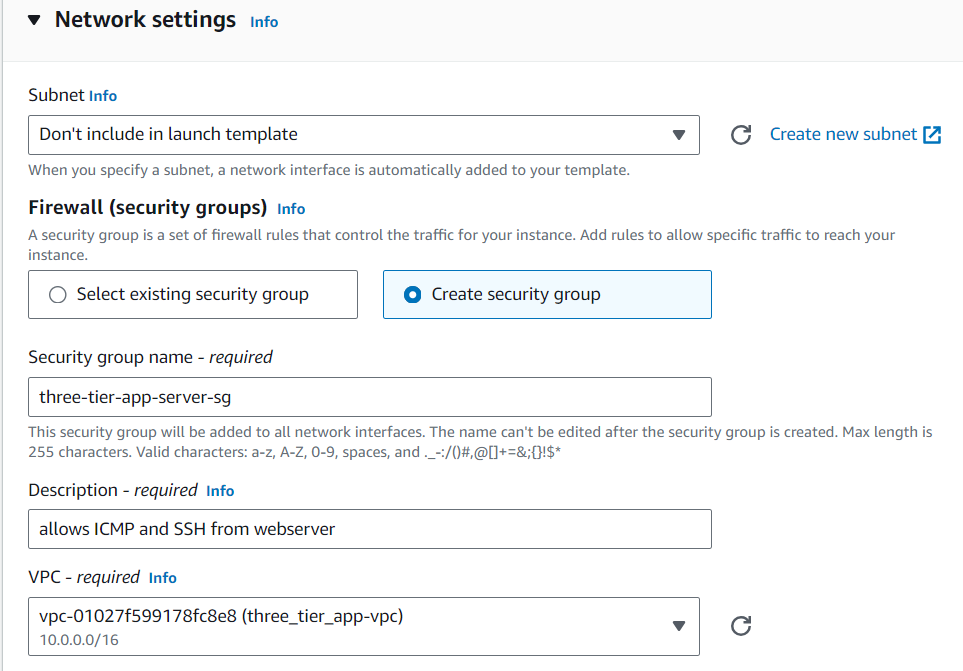
Create an App Server Launch Template
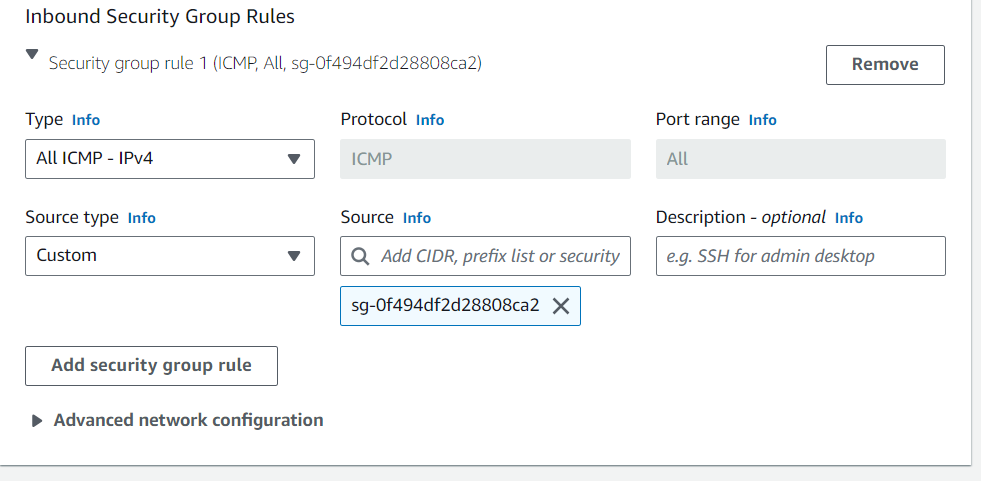
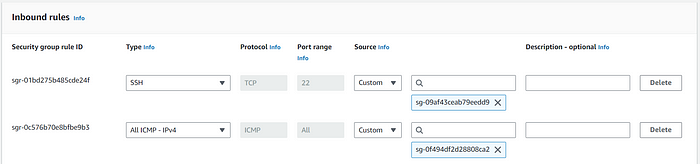
Creating the app server launch template is much like creating the web server launch template. The configuration changes with security group settings. Create a custom security group and add inbound rules for ICMP with a source of the web server security group.
The application servers require access to the database, so MySQL package will be installed on each instance. Enter the below script in the user data section, found under Advanced details.
#!/bin/bash
sudo yum install mysql -y
Review and create the Launch Template.
Create an application server Auto scaling group
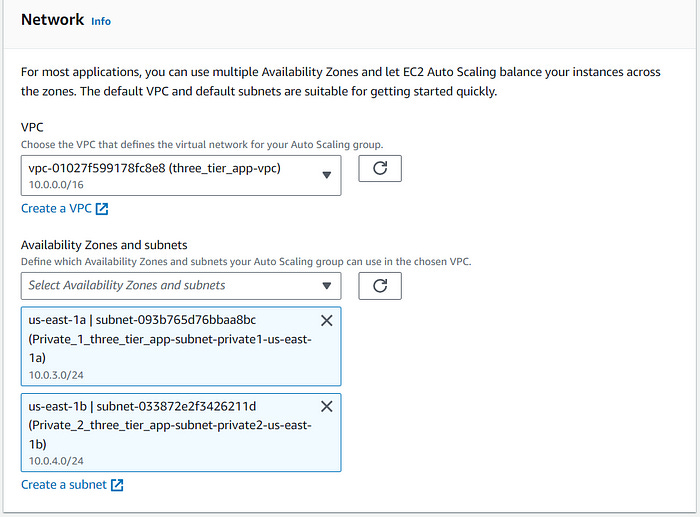
Create a an ASG from the preceding app server launch template. Ensure that the appropriate VPC and two private subnets are selected.
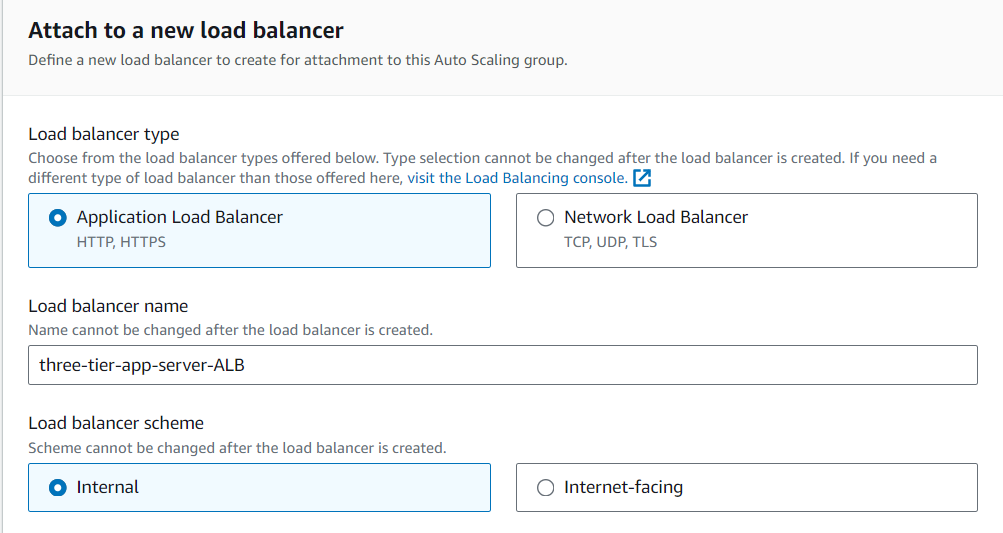
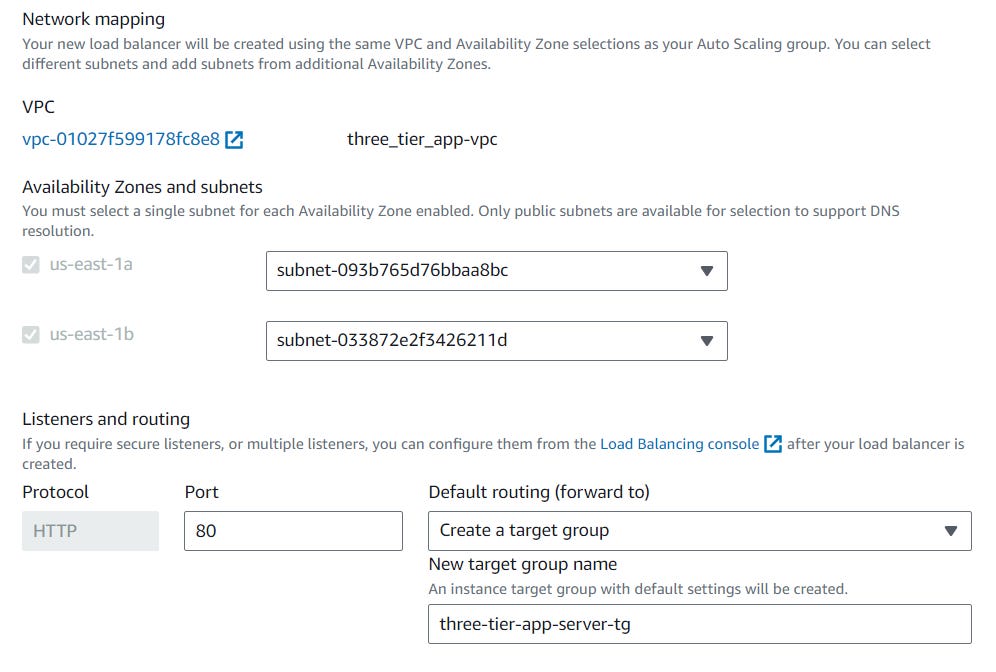
Create an application load balancer
This application load balancer is internal since the routed traffic is from the web servers and not the internet. Create a new target group.

Now, there are two more instances running in the private subnets. Next, connectivity to the application tier from the web tier must be confirmed. SSH into a webserver EC2 instance and ping an app server EC2 instance. The app server instances should only have a private IPv4 address, since they are on private subnets.
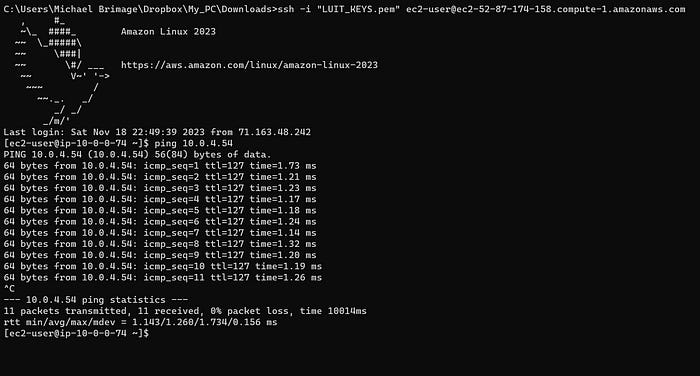
The output confirms that the web tier can communicate with the app tier!
Create a Bastion Host Server
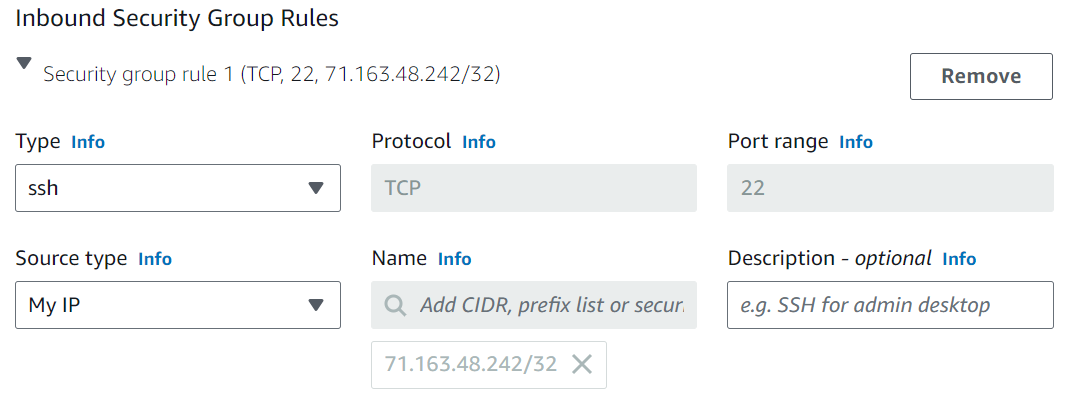
In the EC2 console launce a new instance in one of the public subnets in the VPC. Create a new security group allowing only SSH through “My IP.
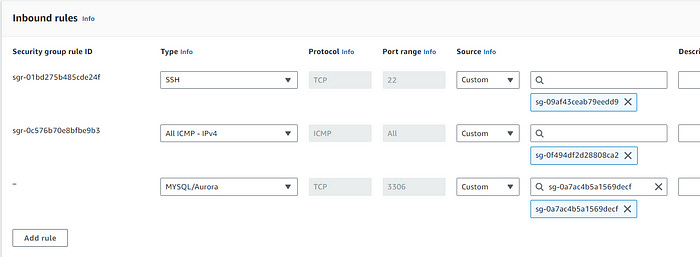
Next edit the inbound rules for the application server security group to allow SSH access from the bastion host server security group.
Now connectivity to the application server from the bastion host must be confirmed.
Important Note: SSH Agent forwarding is required for SSH access to the app server from the bastion host. Here is a video to help understand the how an why:
Connect to private instances via bastion hosts with SSH agent forwarding
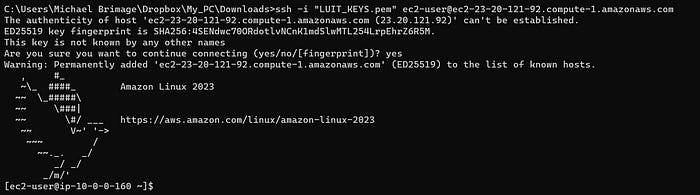
Login into the bastion host using the .pem file
Try to test the connectivity by using the ssh@private-ip of the webserver.It will not be successful
Open the .pem in Notepad++ and then copy all the contents to the bastin host file as test.pem and save it
Change the permission of the test.pem file to 600
From the bastion host use the below command to login into the webserver
chmod 600 test.pem

ssh -i test.pem ec2-user@10.0.137.45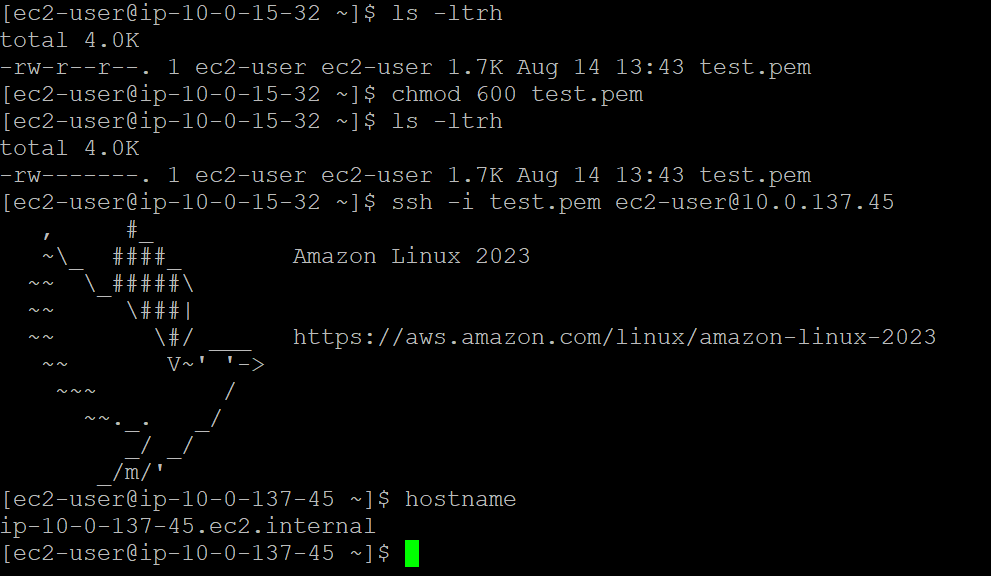
Once the key pair is added to the SSH Agent, SSH into the bastion host with the following command:
ssh -A ec2-user@BASTIONHOST_PUBLIC_IP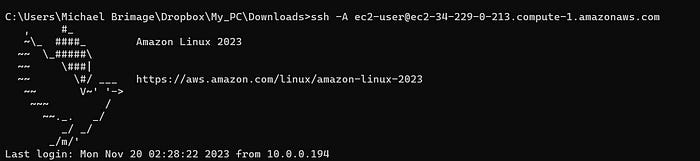
As the bastion host, SSH into the app server using with the following command:
ssh -A ec2-user@APPSERVER_PRIVATE_IP
Notice the command prompt change, this indicates a successful SSH into the app server from the bastion host! The architecture is almost finished. There’s one tier remaining: The Database tier.
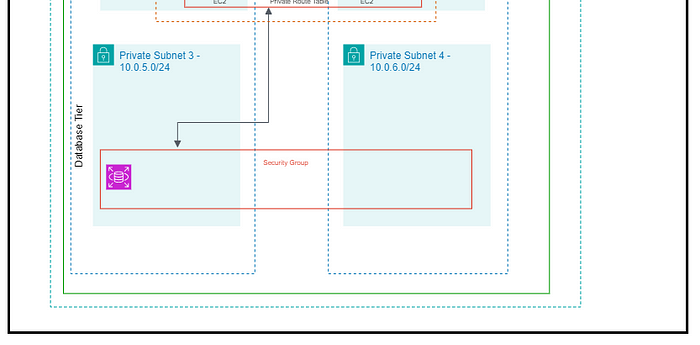
Tier Three: Database Tier
The required services for the database tier are a database security group, a database subnet group and a relational database service (RDS).
Database security group — allows outbound and inbound mySQL requests to and from application servers.
Database subnet group — ensures database creation in the proper subnets.
RDS — MySQL implementation.
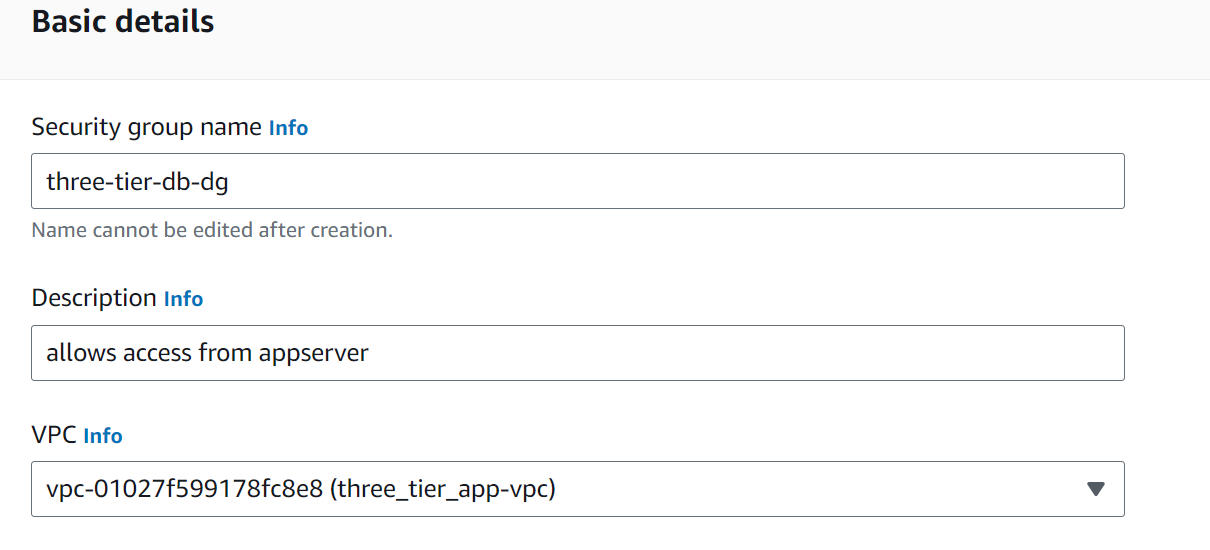
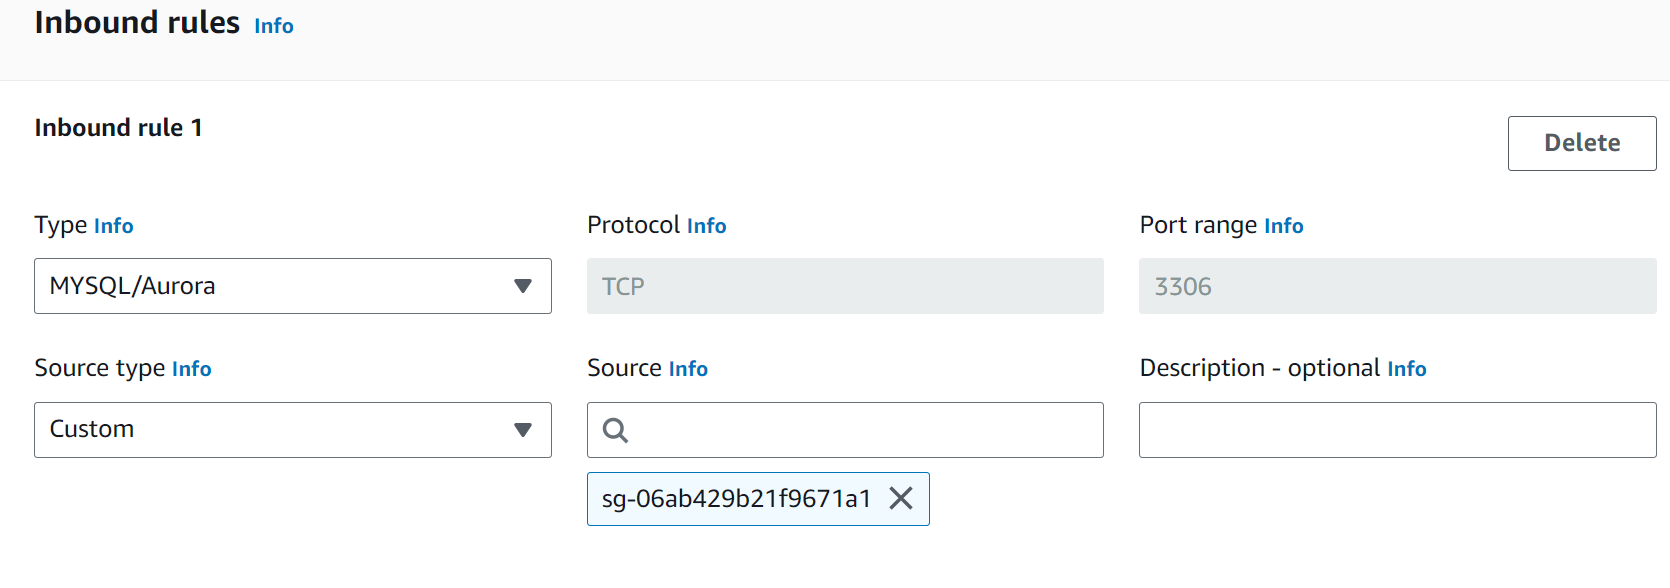
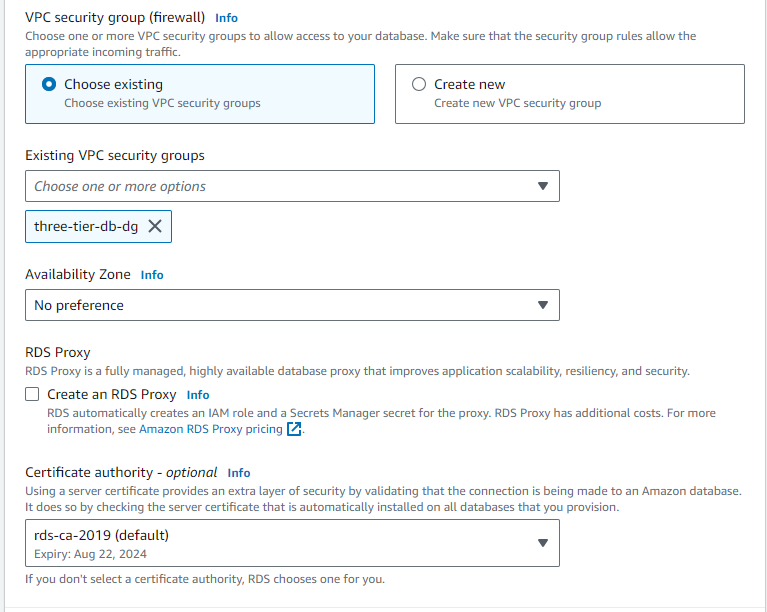
Create a database security group
The database security group allows the application servers to access the database. Create a security group that allows inbound traffic from the app servers. The security group also requires outbound rules allowing the database to send traffic to the application server.
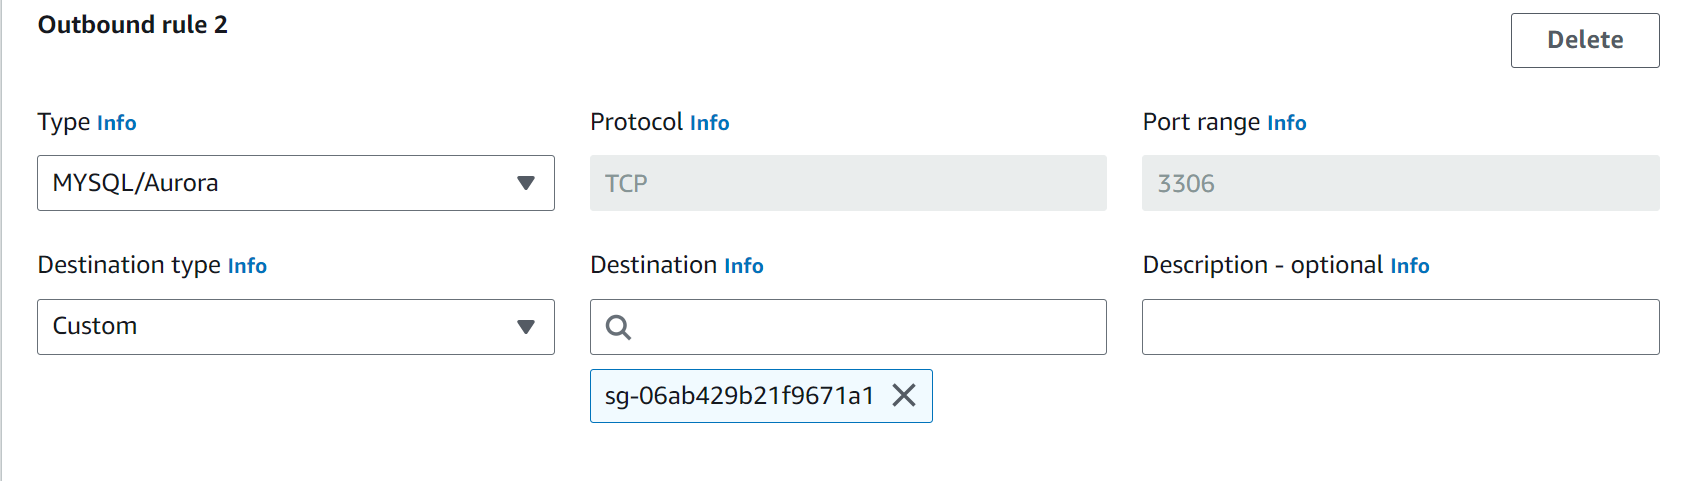
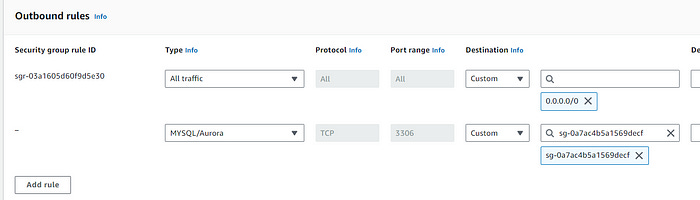
The application server security group requires updating as well. Add an inbound rule to allow MySQL traffic from the database security group. Add an outbound rule to allowing the application server to forward requests to the database security group.
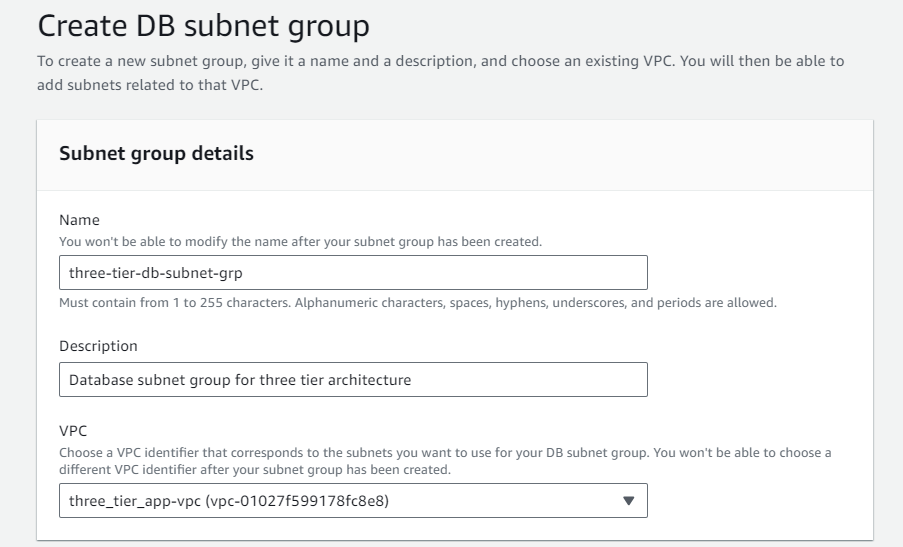
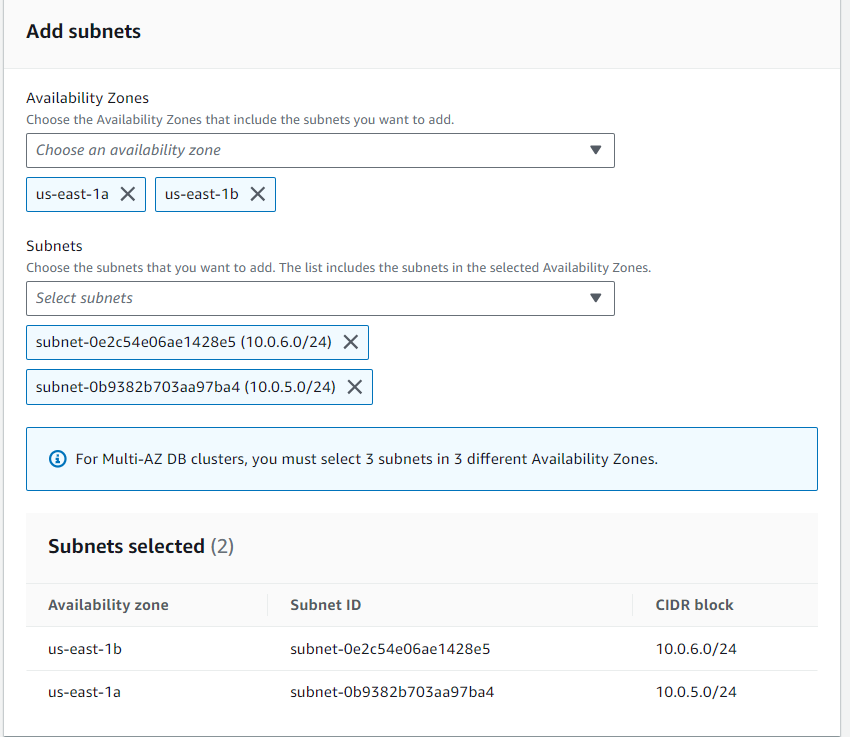
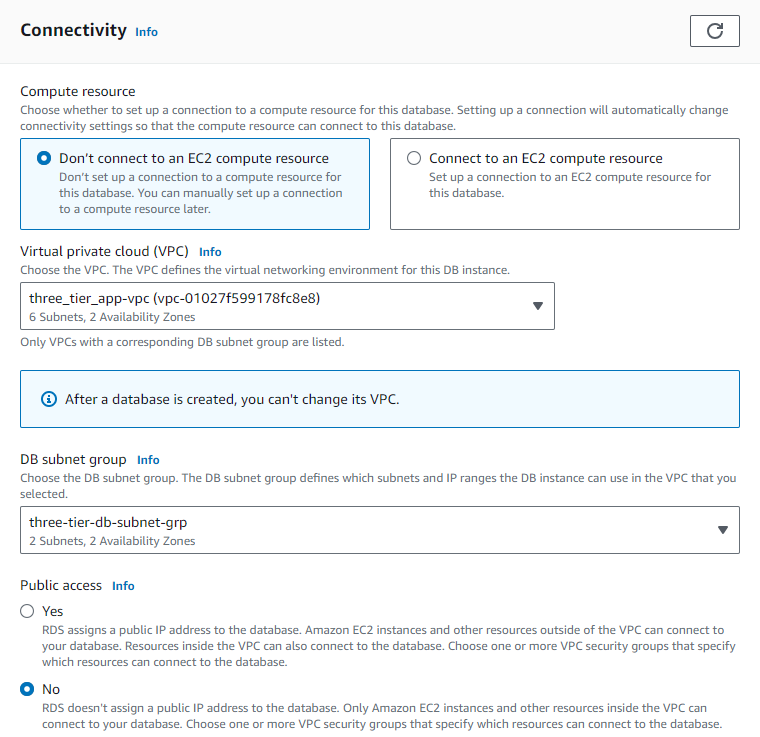
Create a database subnet group
In the RDS console navigate to “Subnet groups”, create a new database subnet group. Ensure that the appropriate VPC is selected. Select the remaining two private subnets (the previous two private subnets are used for the application tier).
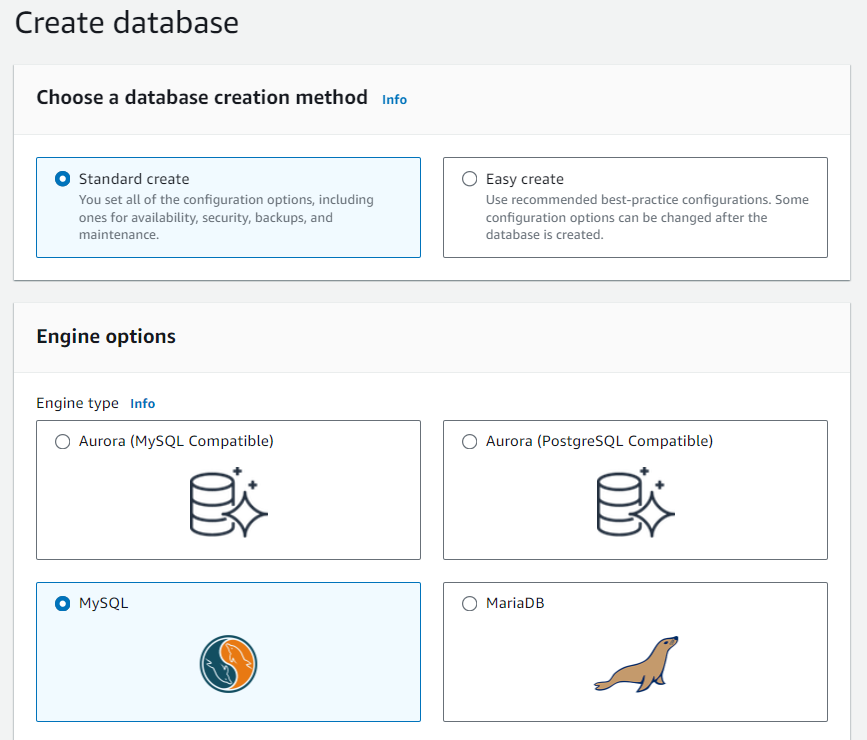
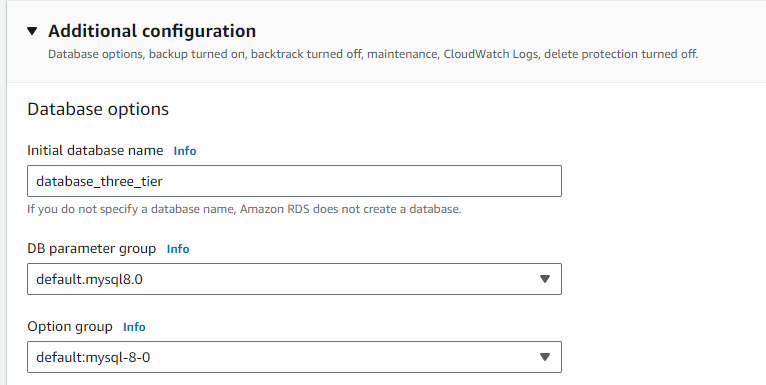
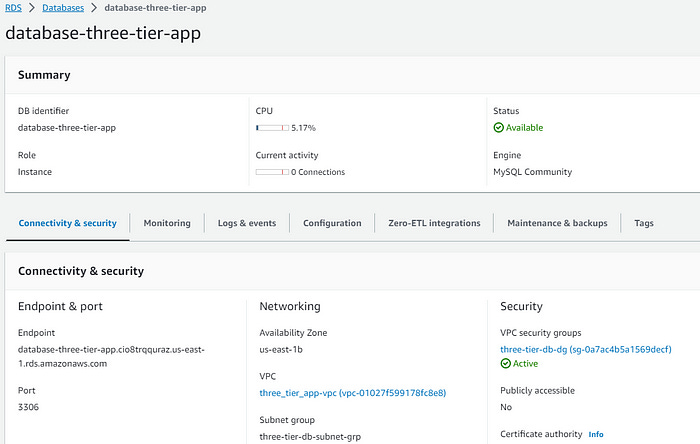
Create an RDS database
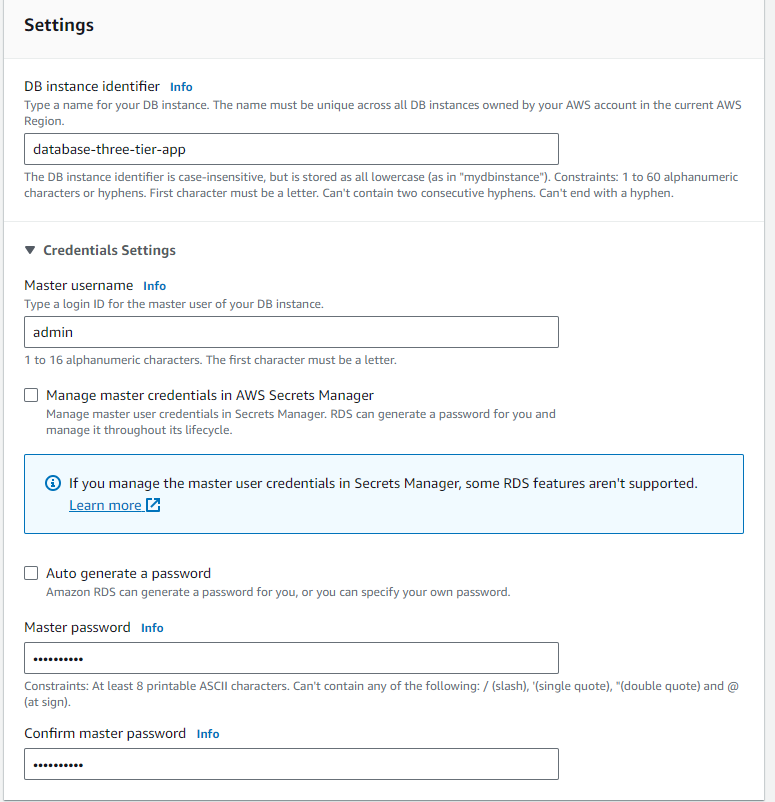
Navigate to “Databases” in the RDS Console. Create a database using standard create. Select the “MySQL” Engine option. Follow the pictures below (left to right) for the correct setup and click “Create database”. Note — for the purposes of this example, “Free tier” is sufficient.
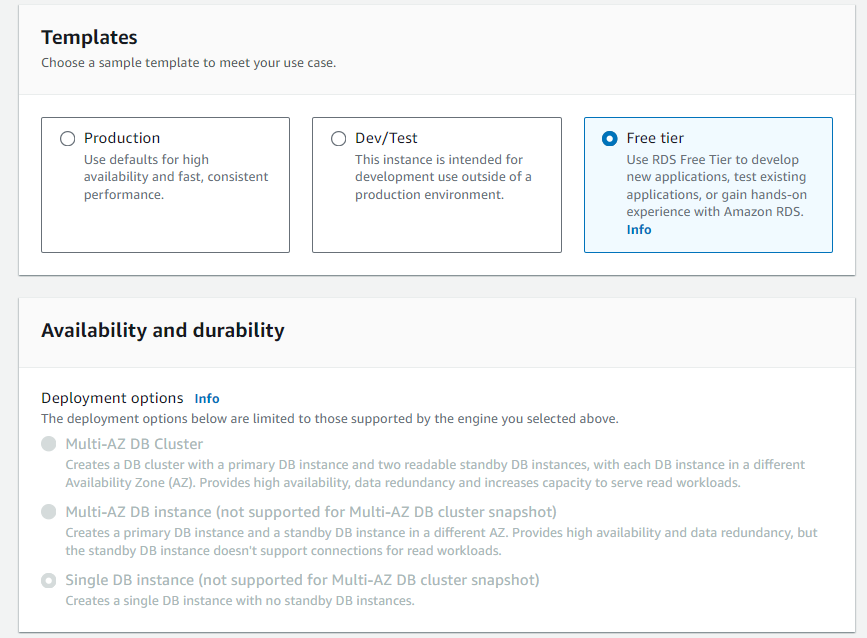
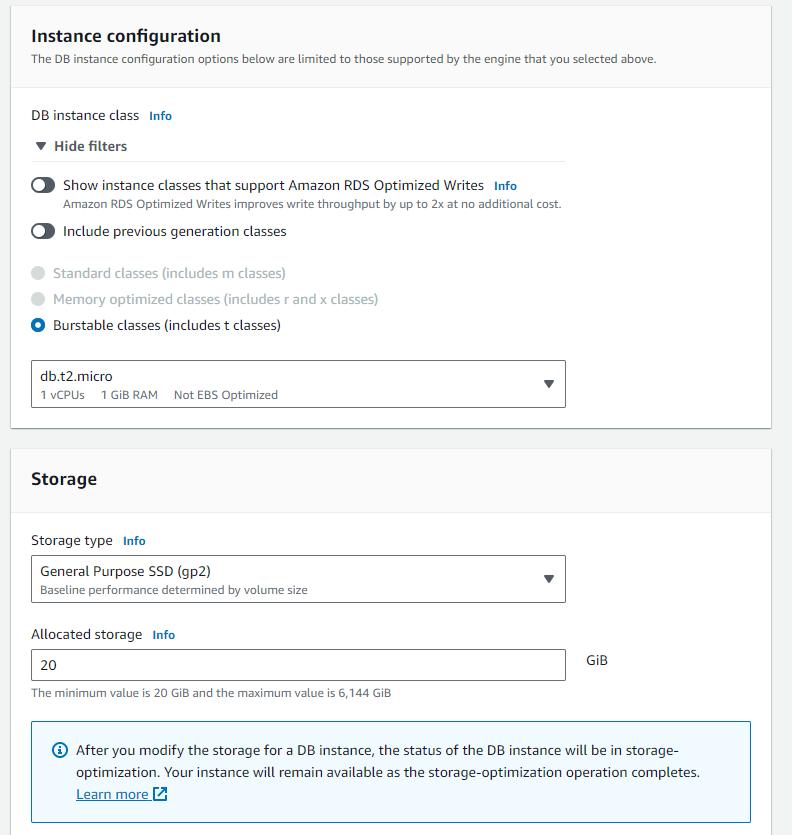
Note — In a production environment, best practices dictate enabling Multi-AZ deployment for high availability. Multi-AZ deployments creates a “failover” database which serves a backup in the event of a failure or disaster affecting the AZ. Multi-AZ deployments incur a much higher cost than “Free tier”.
Connect to the database
The database endpoint must establish a connection from the application server. Take note of the database endpoint.
SSH into the application server through the bastion host. Run the following command:
mysql -h YOUR-DB-ENDPOINT -P 3306 -u DB_USERNAME -pEnter the password created when initializing the database.
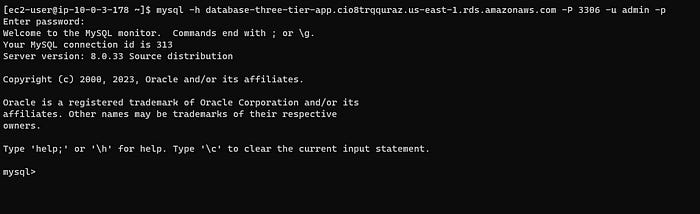
Success!!!
That’s all folks! This task is time consuming and challenging. Completing a huge task like this requires a step by step approach. Hopefully this documentation helps other engineers eat an elephant one bite at a time.
6. Conclusion
Building a three-tier architecture in AWS provides a robust framework for deploying scalable and secure web applications. By following the outlined steps, developers can leverage AWS services to enhance application performance, reliability, and security. Regular monitoring and updates are essential to maintain system efficiency and to adapt to changing demands and potential security threats.